UXPScriptSparker

or: “Getting started with UXPScript in InDesign, and some very rough, seat of the pants speed comparisons with ExtendScript”.

2023-06-12: Important Note: the blog post below refers to InDesign 2023 18.3.

I’ve since been able to try out a prerelease of 18.4 and was shown some tweaks by Veena Datta Dasika from the Adobe team, and the timings are now very similar.

The remaining speed differences are very small and probably just statistical noise.

Repeated runs vary slightly in speed and sometimes ExtendScript gets the upper hand, sometimes UXPScript.

There are two important use cases:
– running pure JavaScript (without accessing the InDesign DOM)
– running code that accesses the InDesign DOM.

Based on my very limited, unscientific tests, I’d say that when it comes to pure JavaScript, UXPScript is a lot faster than executing the same code in ExtendScript.

InDesign DOM access was a lot slower in UXPScript in InDesign 18.3, but will be on a par between ExtendScript and UXPScript from InDesign 18.4 onwards.

UXPScriptSparker is set up to let me to run identical script code either in an ExtendScript engine or in the UXPScript engine.

When running a script with heavy InDesign DOM interaction, my rough measurements seem to indicate that running a script in the UXPScript could be about 3 times slower than running the exact same script in an ExtendScript engine.

UXPScriptSparker

To help me get my head around UXPScript and how it affects the scripting landscape around Adobe InDesign, I made UXPScriptSparker.

https://github.com/zwettemaan/UXPScriptSparker

It’s still early days, and there are a lot of loose ends to be tied and documentation to be written, but it is already working fairly well.

I started out with JSXSparker as the base, and transmogrified it into UXPScriptSparker.

JSXSparker is a generator/framework I created a few years ago to help budding scripters get started with ExtendScript.

https://github.com/zwettemaan/JSXSparker

There’s also CEPSparker:

https://github.com/zwettemaan/CEPSparker

I heavily restructured and rewrote large parts of JSXSparker to end up with UXPScriptSparker.

From past experience in the CEP environment, I have grown into the habit of writing a lot of reusable, ‘multi-purpose’ JavaScript code which can run both in ExtendScript and in CEP/JavaScript.

The disadvantage is that all my code for CEP panels looks like ‘old style’ JavaScript, but I am happy to pay that price for the convenience of reusability, having the exact same code and exact same API’s and libraries available both in ExtendScript and JavaScript.

For UXPSparker, I’ve taken a similar approach, and made it possible to write shared code that can run both in ExtendScript and UXPScript.

The UXPSparker framework contains two scaffolds: an ExtendScript scaffold, and a UXPScript scaffold. These two scaffolds take care of the nitty-gritty details of each environment and hide a lot of implementation details from the main script, allowing the script to be mostly unaware of what environment it is running in.

Part of these scaffoldings are a bunch of shared libraries and APIs, which hide differences between the environments from the main script.

For example, both scaffolds provide a method UXES.fileio.appendUTF8TextFile(), and this method works exactly the same in both scaffolds.

The ExtendScript scaffold is instrumented to use the VSCode/ExtendScript debugger, and the UXPScript scaffold can be debugged with the Adobe UXP Debugger Tool.

The useful part (i.e. the ‘meat’) of the script can be contained in one or more .js files that are written in such a way that the exact same .js file can be executed in UXPScript as well as in ExtendScript, at will.

By being careful and avoiding more modern facilities of JavaScript 🙁 , it’s possible to write reusable code that will run in either environment.

And here is where it gets interesting: as part of UXPSparker I wrote a little sample script that stretches InDesign’s muscle a bit.

This sample script creates a bunch of colored text frames and puts some text in it. Nothing special – my main aim was to have a lot of InDesign DOM interaction.

To try this out for yourself: download the UXPScriptSparker from Github:

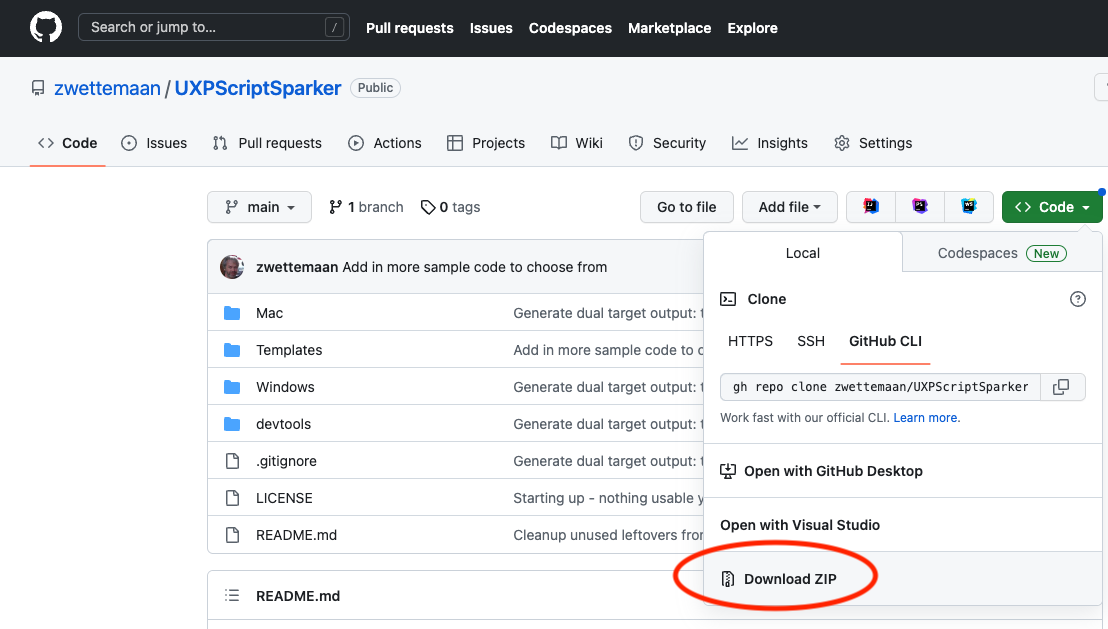
Decompress the .zip and navigate into the Mac or Windows subfolder, depending on your platform.

On Windows you might have to contend with some blue ‘Windows protected your PC‘ warning dialogs from Windows Defender. Click More Info and Run Anyway when that happens.

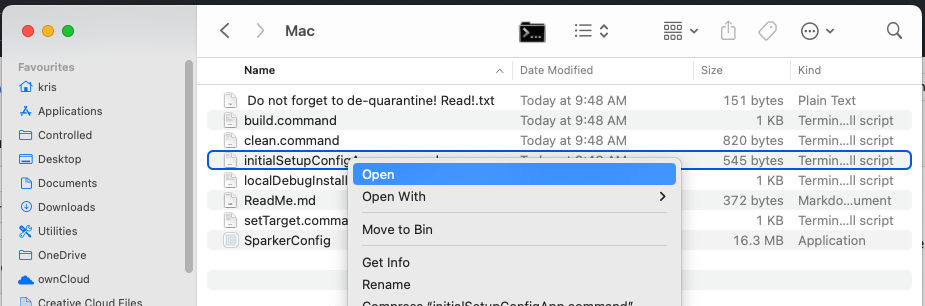
On Mac, you need to de-quarantine the software. Right-click the initialSetupConfigApp.command and then click the Open button:

Then double-click the SparkerConfig or SparkerConfig.exe and configure the starter code. Pick the ColoredTextFrames option in the STARTERCODE dropdown.
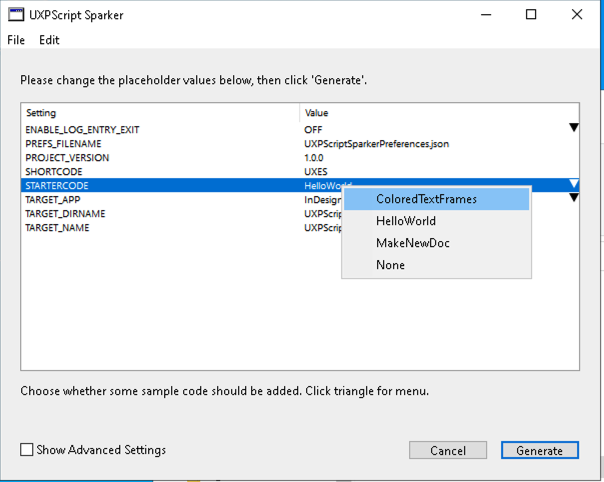
Click Generate

If desired you can now remove the templates and retain only the generated code: navigate into the devtools folder and double-click detachFromUXPScriptSparker.bat or detachFromUXPScriptSparker.command

Now move the UXPScriptSparker-main folder into your Adobe InDesign Scripts panel. Start InDesign and select Window – Utilities – Scripts.

Right-click User and select Reveal in Explorer or Reveal in Finder.

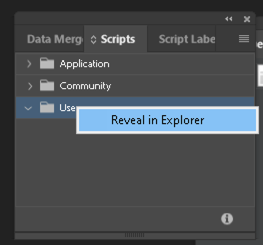
Navigate into the Script Panel subfolder, and move the UXPScriptSparker-main there.

You should now see the UXPScriptSparker-main appear on the Script Panel in InDesign.

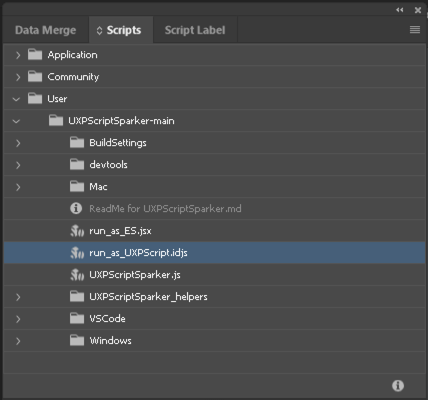
Double-click either run_as_ES.jsx or run_as_UXPScript.idjs.

Speed Comparisons

I used this sample script to run some speed comparisons, and got some surprising results.

My speed comparison was all about InDesign DOM interaction.

I fully expect UXPScript will prove to be a lot faster than ExtendScript when it comes to pure JavaScript execution speed. But pure JavaScript speed is not important to me.

In my line of work, the speed of DOM interaction is what is important: how fast can I make InDesign (or InDesign Server) do something?

Before anything else: none of these tests are very scientific, and need to be taken with a grain of salt.

I did not account for CPU speeds, numbers of cores, or amounts of memory, so comparisons between workstations don’t provide much useful info.

One thing I found is that repeatedly I got abysmally bad timings on multiple workstations.

Resetting the InDesign preferences seemed to cure that.

Not sure what exactly is going on, but clearly it’s possible for InDesign to get into some weird state where scripts run abnormally slow.

To avoid this issue, I reset the InDesign preferences on all the machines I used for testing.

All my Intel-based workstations are reasonably specced – i.e. SSDs, 32GB RAM or 64GB of RAM, and mid-range Intel CPUs. My M1 MacBook Air is a low-level model with only 7 GPU cores and 16GB of RAM.

First surprise: I found my lowly M1 MacBook Air ran rings around all my Intel-based machines, Mac and Windows alike.

Second surprise: with this particular sample script, UXPScript seems consistently about three times slower than ExtendScript in running the exact same script.

For example, it takes around 0.5s to execute the sample script with the ExtendScript engine on an M1 MacBook Air. Running the exact same script in the same instance of InDesign on the same computer with UXScript takes around 1.5s.

An Intel MacBook Pro clocks in at 2.5s running in the ExtendScript engine, and around 7.5s running in the UXPScript engine.

On one of my Windows VM machines, I got around 3.5s (ExtendScript) vs 11s (UXPScript).

So, by my rough measurements, running this particular script with heavy DOM interaction is about 3 times slower in the UXPScript engine than in an ExtendScript engine.

Creative Developer Workshop

Wednesday, June 7th. 2023, Phoenix, Arizona.

This is the day before the Creative Developer Summit, which is on June 8th.

I’ll be running an interactive, one-day advanced workshop during the Creative Pro Week: https://creativeproweek.com/

The workshop is targeted at developers working with Adobe Creative Cloud apps and will cover subjects related to ExtendScript, CEP, UXPScript and a little C++.

I know that many of you struggle with seemingly unpredictable behavior during the development and debugging of your scripts and extensions. This workshop provides you with the background knowledge you need to avoid many pitfalls and oddities.

The cost for a one-day pass for just the workshop on the 7th would be US$372.50.

This includes breakfast and networking lunches.

A two-day pass (workshop on June 7th + Creative Developer Summit on June 8th) is US$647.50.

The workshop will not be recorded, and your physical presence is required. You need to bring a laptop.

Please send expressions of interest, requests, tips, ideas to [email protected]

If you want to register, please contact me at [email protected] – I’ll give you a discount code you need to use when registering at https://creativeproweek.com/

The workshop only has room for 20 attendees. Don’t dawdle if you don’t want to miss out.

The workshop content will be flexible, and in part will be shaped by what is of most interest to the attendees. Subjects we’ll touch on:

Pragmatic Extension Development

  • DRY (Don’t Repeat Yourself): Extensive code sharing between UXPScript/ExtendScript/CEP/Node
  • Shared Service Modules: transparently call across divides into services provided in server, ExtendScript or CEP JavaScript code.
    – allow ExtendScript to call Node/JS functions
    – allow server-based code running in an iframe to call ES functions
    – …
  • Efficient debugging, e.g.
    – how to debug the startup code for a panel
    – in a single debug session, debug ExtendScript, CEP JavaScript and browser-side JavaScript, all at the same time. This technique only applies to some Creative Cloud apps.
  • Server-based panel UI for easy updating: move the UI code from locally stored ZXP into server-stored scripts. Run the panel UI from an iframe served from a remote host.
  • Test-driven code: write self-testing code
  • Write defensive, self-debugging code by adding debug instrumentation
  • CEPSparker: hit the ground running and generate full-fledged starter code for an extension for any of the Creative Cloud apps.
  • JSInterface – the counterpart to CSInterface: Tap the full power of Node/JS from ExtendScript. Make asynchronous calls from ExtendScript into Node/JS.
  • Mix and match ExtendScript, CEP JavaScript and UXPScript
  • Efficient logging

If there is interest:

  • Writing ExtendScript DLLs: how to easily enhance ExtendScript with C++.
  • TypeScript-enabled CEP development
  • Transmogrifying InDesign EPUB output
  • Interesting stuff you can do with InDesign IDML files

Tightener 0.0.8 – Example: Integrating Jupyter Notebooks and InDesign ExtendScript

The Tightener project is still moving forward. I’ve just released alpha version 0.0.8.

Tightener is ‘automation glue’ – it ties together all kinds of computer softwares and allows them to interact in a structured and efficient manner.

Tightener is a developer’s tool – it lives in the background and allows developers to integrate disparate systems.

Watch this little Youtube demo (skip to time stamp 08:00 if you don’t want to see the intro):
https://www.youtube.com/watch?v=_r55k54AuBA

https://github.com/zwettemaan/TightenerDocs/wiki/Tightener-Architecture

This example shows how Tightener is used to make a bridge between Jupyter Notebooks (https://jupyter.org/ – originally from the Python world), and ExtendScript or UXPScript in InDesign.

This combo of Jupyter Notebooks and ExtendScript allows would-be scripters a much smoother way to ‘get into’ scripting.

For someone new to scripting, using Jupyter Notebooks is much more ‘natural’, interactive and instructive than using more specialized tools like Visual Studio Code.

Personally, I use Jupyter Notebooks during the ‘first figure it out’ phases of a new project. Once the basic ingredients have been determined, I’ll switch to Visual Studio Code for the actual system building.

Yes, I know, installing Python3 and Jupyter Notebooks is not really straightforward in its own right, and that presents a different kind of threshold, but once they’re installed, trying out scripts and script statements is much easier.

You can download an alpha version of Tightener from the Github repo:

https://github.com/zwettemaan/TightenerDocs

Version 0.0.8 has a link here:

https://github.com/zwettemaan/TightenerDocs/tree/main/Releases/Alpha

Other Stuff

Other things that are new to the 0.0.8 release: I’ve open-sourced and moved all of the supporting code for Tightener (scripts, plug-ins, and so on) into the TightenerDocs repo on Github, so you can now inspect or access a lot of the source code that makes Tightener ‘tick’.

For example, have a look here:

https://github.com/zwettemaan/TightenerDocs/tree/main/CurrentRelease/CommandLine/Scripts

https://github.com/zwettemaan/TightenerDocs/tree/main/CurrentRelease/SampleScripts

Next Steps

I’ll now turn my attention to the licensing module of Tightener. I want to make it easy for scripters to protect and monetize their work, without having to wrestle with complicated packaging and publishing rules, and Tightener will be instrumental in achieving that.

The basic idea is that Tightener will protect scripts by giving the developer multiple choices – for example: a developer could opt to never physically copt their script onto end-users computers. Tightener would only retrieve the script from the developer’s own server when the end-user computer is licensed to do so and the script would never be saved to disk, which would help in protecting the script against downloading and reverse engineering.

The Tightener licensing module will take care of ‘uniquenizing’ the end-user computer and checking licensing allowances before allowing scripts to run…

More info to come…

JSXGetURL 0.0.9 Update

UPDATE: Feb 13, 2024. This page is outdated, and JSXGetURL 1.x.x has been released. Visit

https://www.rorohiko.com/jsxgeturl

What is it?

JSXGetURL enhances ExtendScript to make it easy to access servers using http or https – e.g. to download assets from a remote server.

JSXGetURL is meant to work with any Adobe Creative Cloud application that has ExtendScript support – InDesign, InDesign Server, InCopy, Illustrator, Photoshop…

JSXGetURL is implemented as an ExtendScript DLL/framework, written in C/C++.

This DLL allows you to access URLs (including https: or ftp:) straight from ExtendScript.

There is nothing to install – all you need to do is //@include a .jsx file which then loads the DLL.

Sample code:


//@include "JSXGetURL/JSXGetURLLoader.jsx"
var getURL = JSXGetURL();

getURL.addRequestHeader("Accept: */*");
var s = getURL.get("https://www.rorohiko.com") + "";

alert(s.substr(0,1000));

var headers = getURL.getResponseHeaders();
alert(headers);

// Some random FTP file for testing

var f = new File("~/Desktop/sha512.sum");
var s = getURL.get("ftp://cygwin.com/pub/gcc/sha512.sum", f.fsName);

// Some zip file to test binary file download

var f = new File("~/Desktop/FrameReporter.1.1.8.zip");
getURL.get("https://www.rorohiko.com/downloads/FrameReporter.1.1.8.zip", f.fsName);

JSXGetURL is a wrapper around libcurl which in turn is using open source code from OpenSSL, Boost, zlib.

The last few weeks, I put a fair bit of work in updating JSXGetURL. Version 0.0.9 is now available:

https://www.rorohiko.com/downloads/rr612412/JSXGetURL.0.0.9.zip

Changes

  • Added some simple functions to access request and response headers.
  • M1 support on Mac
  • Upgraded a bunch of dependencies. JSXGetURL now uses
  • zlib 1.2.13
  • Boost 1.81.0
  • OpenSSL 3.0.7
  • Curl 7.81.0
  • Visual Studio 2019 on Windows
  • Xcode 14.2

Licensing

The .zip file contains a fully functional, time-bombed version of JSXGetURL – it will expire on 30-June-2023.

I am currently still working hard on the Tightener project, and by then I hope to have the licensing module in Tightener functional enough to handle a licensing scheme for JSXGetURL. I’ve tried to run JSXGetURL as a ‘sponsored/donationware’ project for a few years, but that has not worked. From June onwards, there will be some subscription fee to be paid for continuous use.

InDesign GREP styles gotcha…

I was mucking around with InDesign GREP styles for auto-formatting dollar values, and had a bit of trouble getting it to work.

If you’re not interested in wading through the technical information below – you’re just poking around to find some example of how to format prices in InDesign: scroll down. The working solution is at the end of this post.

After a lot of hemming and hawing, I figured out what it was that made it behave in a way I did not expect.

Lookbehind does not allow for variable-length patterns

I was formatting prices, and had the following patterns set up:

While experimenting, I had given all the character styles involved a different colored stroke, so the characters would ‘glow’ in different colors depending on the character style applied to them.

This makes things a lot easier when used it together with the Preview option on the Paragraph Style dialog.

The raw text looks like this:

After applying the paragraph style, the result looked like this:

which means it did not format the cent values as expected.

As it turns out, positive lookahead (?=... allows variable length patterns, but positive lookbehind (?<=... does not.

So these patterns, which have lookbehind, did not work:

(?<=\d+)\.(?=\d{2})
(?<=\d+\.)\d{2}

Both patterns look behind for one or more decimal digits.

\d means a decimal digit;
\d+ means one or more digits
(?<=) means: look behind the character we’re currently working on
\. means: a period
(?=) means: look ahead from the character we’re currently working on
\d{2} means exactly two decimal digits

The first pattern means: look for a period, and then look behind (i.e. to the left of) that period and verify you can see one or more digits. Then look ahead of the period and verify you can see exactly two decimal digits.

But this pattern, a lookahead, does work:

\$(?=\d+\.\d{2})

Removing the + from the positive lookbehind patterns makes it all work:

My working solution:

I’ve put the styles into style groups ‘GREPStyles’ (to keep things organized):

The character styles are:

DollarSign: [None] + superscript
DollarValue: [None]
DecimalPoint: [None] + size 0.1pt + color: [None]
CentValue: [None] + superscript

The paragraph GREP style is set to:

Apply DollarSign to:
\$(?=\d+\.\d{2})

Apply DollarValue to:
(?<=\$)\d+(?=\.\d{2})

Apply DecimalPoint to:
(?<=\d)\.(?=\d{2})

Apply CentValue to:
(?<=\d\.)\d{2}

This is not perfect, but it’ll do for me.

You could easily extend this to also handle thousands separators – I leave that as an exercise.

Postscriptum:

David Blatner gave me a great tip which can be used to achieve a more precise matching and less ‘iffy’ results: the \K pattern.

This pattern allows us to do ‘lookbehind without lookbehind’ and does not have the same issues as lookbehind.

More info here:
https://www.regular-expressions.info/keep.html

Tightener 0.0.6 Public Alpha

Note 13-Feb-2024: Creative Developer Tools is the first tool which uses Tightener to offer new features for UXP and ExtendScript developers. More info about the alpha version here:
https://www.rorohiko.com/crdt

The second public alpha of Tightener is available.

It consists of a single .zip file which works on Mac, Linux and Windows.

This version adds new integrations of Tightener into any Adobe® Creative Cloud applications that support ExtendScript.

It adds the Tightener Daemon CEP panel which helps Tightener run its event loop.

The Tightener Daemon CEP panel is available as a ZXP file which can be installed by way of Anastasiy’s Extension Manager.

To download, visit:

https://github.com/zwettemaan/TightenerDocs/tree/main/Releases/Alpha

For documentation, visit:

https://github.com/zwettemaan/TightenerDocs/wiki/Tightener-Docs

To see a few of the planned features, visit:

https://github.com/zwettemaan/TightenerDocs/issues

Tightener 0.0.5 Public Alpha

The first public alpha of Tightener is available.

It consists of a single .zip file which works on Mac, Linux and Windows.

To download, visit:

https://github.com/zwettemaan/TightenerDocs/tree/main/Releases/Alpha

For documentation, visit:

https://github.com/zwettemaan/TightenerDocs/wiki/Tightener-Docs

To see a few of the planned features, visit:

https://github.com/zwettemaan/TightenerDocs/issues

For a YouTube video demo, visit:

Tightener Status Update

Quick status update on Tightener: the project is still moving; I am slowly gearing up for a first alpha release.

A big chunk of work has been making the TQL glue language support ‘cooperative multitasking’.

Unlike JavaScript, where scripts are not running concurrently, but instead ‘pass the baton’ using constructs like Promises or async/await, TQL provides cooperative multitasking baked into the language, so multiple TQL scripts can run concurrently.

Next step will be to add a ‘yield()’ function to ExtendScript. The idea is that your ExtendScript would call ‘yield()’ frequently, and TQL scripts would then run a bit on each yield.

The use case I am working towards is around InDesign Server. One would use Tightener/TQL to coordinate things.

A web server could interact with the InDesign Server, and launch a TQL script containing an embedded ExtendScript on the InDesign Server.

The ExtendScript would be the ‘meat and potatoes’ script which does pagination, rendering, exporting,… whatever we typically do on InDesign Server.

The TQL script would continue to run concurrently with the ExtendScript and it would be able to easily send live feedback info to the web application (e.g. to show progress bars, update job progress, report failure or errors, interact with the user via the web browser,…)

This would make ExtendScript less of a ‘blocker’ and allow more lively behavior of the InDesign server.

Stay tuned…

JSXGetURL Sponsorships

UPDATE: Feb 12, 2024. This page is outdated, and JSXGetURL 1.x.x has now been released. Visit

https://www.rorohiko.com/jsxgeturl

Note: 23-Jan-2023: the sponsorship approach did not work, and JSXGetURL now uses an activation system.

Also see

https://coppieters.nz/?p=720

Note: If you are using version 0.0.7 or below, it will have stopped working by now because it was time bombed on December 31 of last year. You will have to update to version 0.0.9 (see link below).

JSXGetURL has been updated – I now have an M1 version available, but only for Github sponsors.

JSXGetURL adds basic http/https/ftp functionality to all Adobe apps that support ExtendScript – this includes InDesign, InDesign Server, Photoshop, Illustrator…

More info: https://coppieters.nz/?p=720

There is nothing to install, no admin privileges needed. You just need to add a folder with a few .jsx files to your ExtendScript project, and you can simply write ExtendScript like:

#include "JSXGetURL/JSXGetURLLoader.jsx"

var getURL = JSXGetURL();

var s = getURL.get("https://www.rorohiko.com");

alert(s.substr(0,1000));

and this works in InDesign Server, ExtendScript Toolkit, Bridge, InDesign, InCopy, Illustrator or whatever else supports ExtendScript, and it works both on Mac and Windows. And it’s very fast because it’s all compiled C/C++ code.

Note 23-Jan-2023: The sponsorship approach I tried in 2022 did not work, so I decided to change the strategy. The plan is that from June 2023 onwards, JSXGetURL will be subject to a subscription fee.

The link below gives you access to a fully functional version 0.0.9. It is time-bombed to stop working at 30-Jun-2023.

If all goes well, the subsequent updated version will be available for a subscription fee.

https://www.rorohiko.com/downloads/rr612412/JSXGetURL.0.0.9.zip

Tightener – Automating Creative Apps

I’ve been working hard on Tightener these last few months, and finally managed to build enough infrastructure to show a meaningful proof-of-concept demo.

The idea for Tightener occurred to me when setting up a web server that interacts with InDesign Server in the backend.

That integration is cumbersome and not straightforward, and developing and testing code is hard.

Doing this requires:
– setting up some method to synchronize data transfer between the various servers. Things like Samba or WebDAV or shared cloud volume. Synchronization problems abound.
– setting up some method to pass data from the web server to the scripts that need to run on the InDesign Server
– setting up some way to test and debug and deploy scripts on the live server
– maintaining multiple pools of code – web server code on one end, InDesign ExtendScript code on the other.
– setting up some method to monitor and track the jobs that are processed by the InDesign Server. Is the job complete? Has it crashed? Where to send the log files?

With Tightener that will all becomes a whole lot easier.

– Tightener is to offer bi-directional data transfer, synchronization and message passing. The web server can receive events from the InDesign server as the jobs progress
– Unified code base and simplified deployment: if so desired, InDesign scripts can be embedded into the web server code repository. Tightener can auto-deploy the scripts to the InDesign server as needed.
– Simplified testing and debug workflow. Interactively run the script against a local InDesign Desktop and a remote InDesign Server ‘as you go’.

There is still a lot of work to be done, but I’ve managed to get past a few sizeable hurdles.

I’ve got Tightener embedded in an initial InDesign plug-in. This extends InDesign with a new language called TQL (in addition to ExtendScript, VBScript and AppleScript).

TQL can access the InDesign DOM (I still have a lot more to cover here, but I’ve figured out how to do it, and finalizing the DOM access is just a matter of ‘more of the same’).

Tightener also handles IPC (InterProcess Communications) so multiple Tightener nodes on a workstation can interact with one another – e.g. a command line script runner can run TQL scripts in InDesign.

Here’s a YouTube playlist with more info:

https://www.youtube.com/playlist?list=PLuW3sE8aHqZa_9BBRIDKAUnLH65JZ-PRC

Also a link to the Tightener documentation project (rudimentary at the moment:

https://github.com/zwettemaan/TightenerDocs/wiki/What-is-Tightener%3F