Xcode 9 Setting Names vs. Setting Titles

See screenshot below. That should help.

I use Xcode only every so often, and when I do, things have moved on, and I always feel like a stranger in a strange land.

I think Apple is rearranging the furniture (i.e. changing the UI) just for the heck of it.

So, I was in for another spate of Xcode, and for the life of me, I could not figure out how to show build setting names instead of setting titles.

The Build Setting Titles are the readable version (e.g. ‘Enable Objective-C Exceptions’), and the Build Setting Names are the uppercase things (e.g. CLANG_ENABLE_OBJ_ARC).

In the past I used to be able to double-click any one of those titles or names and it would flip between the two states. That does not work any more. Probably that worked too well, and developers were way too efficient.

Later, I think I vaguely remember there was a some clickable control somewhere you could click. If it was ever there, it’s gone now.

For Xcode 9 it took me quite a bit of effort to find where it is now. It’s under the ‘Editor’ menu – ‘Show Setting Names’ or ‘Show Setting Titles’.

Also, there is a new Project/Targets sidebar that I don’t remember seeing in previous Xcode versions.

That sidebar is important. And probably because it is important, it is well hidden and not easy to find.

Below a screenshot that shows where those darn things are in Xcode 9. Hope this saves someone else some frustration.

ExtendExtendScript/GetURL: now with a simple installer

Note 23-Jan-2023: Make sure to check out my novel approach to GetURL: making curl available in ExtendScript. Not just for InDesign – any Adobe app that supports ExtendScript can use this. More info here:

https://www.rorohiko.com/jsxgeturl

If all you want to get is an easy-to-use GetURL function for InDesign ExtendScript, I now have a simple installer to install ExtendExtendScript with the GetURL plug-in.

Version 1.0.4 was released on 16-Dec-2019 and supports InDesign 2020/macOS Catalina. This is a labor of love, and maintaining this tool is a substantial cost to Rorohiko. If this extension is useful to you, help us properly gauge how useful this is to you, and show us your level of interest and appreciation by donating via PayPal to [email protected]. If there is sufficient interest and appreciation, we’d be encouraged to keep on releasing updates!

Download it here: https://www.rorohiko.com/downloads/ExtendExtendScript.1.0.4.zip

Important: no warranties, neither expressed nor implied: use at your own risk.

You can find the source code and read more about ExtendExtendScript and how it works in some of my other posts: https://coppieters.nz/?p=133

If you’re not interested in how ExtendExtendScript works and all you want to do is access some URL from ExtendScript, this installer is for you.

The ExtendExtendScript extension is invisible. All it does is augment the InDesign ExtendScript environment with some new functions you can call.

It only works from a persistent ExtendScript engine; don’t run it from the ‘main’ engine, which is not persistent.

After installing this extension you can access a full-fledged HTTP/HTTPS downloader callable from ExtendScript, and you can write ExtendScript code like the following examples:

// Need to run in a persistent engine for callbacks to work
// Make sure to add JSInterface.jsx and json2.jsx

#targetengine TestSomewhere
#include "JSInterface.jsx"

function handleData(data) { 
 var fileURL = "~/Desktop/image.jpg";
 var file = new File(fileURL);
 file.encoding = "BINARY";
 file.open("w");
 file.write(data);
 file.close();
 alert("File downloaded to " + fileURL);
}

// Download an image file in ExtendScript over https
var url = "https://www.rorohiko.com/MagnetoGuides2-poster.jpg";

JSInterface.evalScript(
  "JSInterface.plugins.getURL(JSInterface.getData())", 
  url, 
  handleData);

Or

// Need to run in a persistent engine for callbacks to work
// Make sure to add JSInterface.jsx and json2.jsx

#targetengine TestSomewhere
#include "JSInterface.jsx"

// Some sample ExtendScript code. Fetch a URL over https and display 
// in an alert

function handleData(data) { 
 alert(data);
}

var url = "https://www.rorohiko.com/welcome.msg";

JSInterface.evalScript(
  "JSInterface.plugins.getURL(JSInterface.getData())", 
  url, 
  handleData);

This installer came about because I had built a more or less ‘standardized’ installer for installing the more recent software I wrote for Rorohiko. This installer does not rely on the ExManCmd command line tool, so it should be more robust. ExManCmd fails way too often, so I avoided using it.

And because I had the installer available anyway, I decided to roll off a copy just for ExtendExtendScript. Hope it proves useful!

Slide Guitar

Around New Year, I was at the Whare Flat folk festival in Dunedin; my second time around.

http://www.whareflat.org.nz/

I attended a few workshops: Bluegrass Jam, Old-time Music Jam, and one about slide guitar.

Tony Burt let me use his own personal resonator guitar, and I had great fun.

https://www.tonyburt-creative.com

So, I’ve ordered Yet Another Guitar – a Gretsch G9210 Boxcar Square Neck Resonator. I wish I could afford a real Dobro, but as I am just getting my feet wet, the Gretsch will most certainly do.

I did not know, but it turns out there are multiple types of slide guitar: some are played like regular guitars, some are played while they lie on the lap.

The ‘regular’ ones have a round neck, and the strings are not too high above the frets, so you can either fret them normally with your fingers, or use a slide or bottleneck around your finger to play them.

The ‘square neck’ ones are the ones you hold flat on your lap. There the strings are much higher above the frets: the frets only serve as an indication of where the tone lies, and you use a steel slider to change the tone.

These guitars are often tuned in all kinds of tunings; when I played Tony’s guitar, it was tuned G D B G D B.

I love the totally different sound coming from these guitars. Hope I manage to learn to play it properly.

Getting off Facebook

Welcome to my blog!

I finally bit the bullet, and decided to get off Facebook.

I weighed up the pros and cons, and in the end, the cons weighed heavier.

Despite being about ‘getting people together’, I think that in the end, Facebook is more about splitting people apart than about getting people together.

I’ve seen former friends become really angry at one another and never talk to each other again because Facebook is fanning the flames of discord. I cannot help but think of ‘Radio Mille Collines’.

Staying in touch with family and friends and things like community groups on Facebook serve a purpose, but that’s not enough to turn a blind eye to the harmful side of Facebook.

So, instead of Facebook, I’ll be here, on this blog!

I am also still on Flickr:

https://www.flickr.com/photos/zwettemaan

If you’re so inclined, you can send me a friend request – by default, no personal pictures are shown, but friends and family can see personal pictures too.

On Instagram:

https://www.instagram.com/kriscoppieters

On Twitter:

https://twitter.com/zwettemaan
https://twitter.com/k_coppieters

You can also leave comments on this blog, or email me at

kris <AT> coppieters.nz

However, I want to share you the story why I have a beard.

When I started to develop my first wispy hairs on my chin, I decided that I was never going to shave. Assuming a man needs 5 minutes each day to shave, and assuming I was going to live to 72, I was going to save (72 – 17) * 365.25 * 5 = 100443.75 minutes = 70 days of my life.

The story has a sad ending: I think I wasted all my gains on social media 🙁

So, come back occasionally. My blog will mostly be terribly boring, but there might be some interesting nuggets here and there.

Final word: I would like to ask everyone who read this far to try and avoid using the word ‘they’, or at least, be aware of it when you’re using it.

You’ll notice lately there is a steep incline in its usage: ‘They do this’, ‘They all believe that’,… and invariably it’s an indication of stereotyping.

If you hear yourself say ‘They’… stop and think!

Try to put some names to the ‘they’. If you cannot put forward any people’s names, but instead your mind’s eye comes up with a faceless stereotype image of ‘a person’, question yourself.

ExtensionManager trouble when installing ExtendExtendScript?

I was contacted by someone who had trouble installing the new GetURL stuff I concocted a few months ago.

Here are some notes that might be helpful if you’re having similar issues:

Please take what follows for what it is worth. There are a number of assumptions being made in the info below which might be incorrect.

​Sometimes ExManCmd does not want to install stuff, and that also affects any third party installers that use ExManCmd.

My theory is that there is some kind of extension repository that is used by ExManCmd.​​

Once that repository gets corrupted, nothing that needs ExManCmd works any more.

The simplest (but most annoying) fix is ‘scorched earth’: uninstall and scrub the computer of anything Adobe, then reinstall from scratch. I don’t like that very much. ​​

The way I get around it for stuff that needs to be deployed is to not use ExManCmd at all; I use Xojo to write my own installers, and in my installer simply ‘unzip’ the .ZXP file where it needs to go.

With some care, I can make sure no odd unwanted files sneak in and the code signatures don’t get invalidated, and it works.

​Yet another ‘sledgehammer’ approach that also works for me is outlined below.

This is probably only practical on an individual workstation. You don’t want to deploy to many computers using the following approach.

​To avoid signature issues, you might want to first turn off the signature checking. In other words, turn on PlayerDebugMode.

See
https://github.com/Adobe-CEP/CEP-Resources/wiki/CEP-5-HTML-Extension-Cookbook-for-CC-2014
or similar, and search for PlayerDebugMode

The ‘unzip straight into CEP/extensions’ might actually work without tweaking PlayerDebugMode as long as you don’t invalidate the signature, but that’s not always straightforward; it’s easier to set PlayerDebugMode.

I use the following command line script on Mac (I put it into a double-clickable shell script file called ‘setPlayerDebugMode.command’):​ ​

defaults write com.adobe.CSXS.4.plist PlayerDebugMode 1 
defaults write com.adobe.CSXS.4.plist LogLevel 5 
defaults write com.adobe.CSXS.5.plist PlayerDebugMode 1 
defaults write com.adobe.CSXS.5.plist LogLevel 5 
defaults write com.adobe.CSXS.6.plist PlayerDebugMode 1 
defaults write com.adobe.CSXS.6.plist LogLevel 5 
defaults write com.adobe.CSXS.7.plist PlayerDebugMode 1 
defaults write com.adobe.CSXS.7.plist LogLevel 5 
defaults write com.adobe.CSXS.8.plist PlayerDebugMode 1 
defaults write com.adobe.CSXS.8.plist LogLevel 5 
killall -u `whoami` cfprefsd ​​

Make sure to ‘chmod +x setPlayerDebugMode.command’

And I have another script to reverse that in shell script ‘clearPlayerDebugMode.command’:​

defaults write com.adobe.CSXS.4.plist PlayerDebugMode 0 
defaults write com.adobe.CSXS.4.plist LogLevel 1 
defaults write com.adobe.CSXS.5.plist PlayerDebugMode 0 
defaults write com.adobe.CSXS.5.plist LogLevel 1 
defaults write com.adobe.CSXS.6.plist PlayerDebugMode 0 
defaults write com.adobe.CSXS.6.plist LogLevel 1 
defaults write com.adobe.CSXS.7.plist PlayerDebugMode 0 
defaults write com.adobe.CSXS.7.plist LogLevel 1 
defaults write com.adobe.CSXS.8.plist PlayerDebugMode 0 
defaults write com.adobe.CSXS.8.plist LogLevel 1 ​
killall -u `whoami` cfprefsd​ ​

These scripts hit all of CC, CC 2014, CC 2015, CC 2017 and CC 2018 in one go.

​Once the PlayerDebugMode is set to 1, you can run extensions with ‘invalid’ signatures. ​

The second step is to use a standard unzip command line tool, to unzip the ZXP file into the location it needs to go.

I do something on the Mac command line:​ ​

cd  ~/Library/Application Support/Adobe/CEP​/extensions 
mkdir com.rorohiko.extendExtendScript 
cd com.rorohiko.extendExtendScript 
​unzip ...pathtozxp.../com.rorohiko.extendExtendScript.zxp

​That seems to work.

Note that the manifest of the downloadable ZXP is only set to go up to CC 2017 – it needs to be adjusted to also support CC 2018. I’ll change that some time when I get round to it.


ExtendExtendScript/GetURL Bug Fix

Note 1-Nov-2020: Make sure to check out my novel approach to GetURL: making curl available in ExtendScript. Not just for InDesign – any Adobe app that supports ExtendScript can use this. More info here:

https://www.rorohiko.com/jsxgeturl

Quick note: someone actually tried using the new GetURL to fetch a JPEG file over https from ExtendScript, and noticed that file was corrupted. This due to a bug in node_modules/GetURL/index.js. Around line 105 a line is missing:

 protocol.get(parsedURL, function(response) { protocol.get(parsedURL, function(response) {
 response.setEncoding('binary'); // <<< THIS IS MISSING
 function checkForCompletion() {

I’ve updated the downloadable material. Updated version is at the same location:

https://www.rorohiko.com/downloads/com.rorohiko.extendExtendScript.zip

More info in the original post:

GetURL for InDesign, Revisited (now with https)

ucf.jar gotchas


Note 16-Oct-2017: For High Sierra users: you need to install Oracle JDK 7 or suchlike and then switch to JDK 7, otherwise ucf.jar won’t run because of missing security providers.
The link below works at this time, but Oracle’s links seem to move stuff around frequently so you might need to poke around a bit to find JDK 1.7u80. Grab it when/while you can.
http://www.oracle.com/technetwork/java/javase/downloads/java-archive-downloads-javase7-521261.html
On the command line, something like

/usr/libexec/java_home -V

shows you what Java versions you have. I then use

export JAVA_HOME=`/usr/libexec/java_home -v 1.7.0_80`

or similar to switch to the JRE 7 before running ucf.jar

Lately I made some automated build setup for an Extension to one of the apps in the Adobe Creative Cloud, and I decided to use ucf.jar for signing (see https://www.adobeexchange.com/resources/7).

In the process, I bumped into some gotchas and interesting tidbits.

I suspect the info below could be old news to many people, or ‘duh’-level stuff that is spelled out in the documentation, but just in case it is not, it’s documented here.

I’ll document my findings here, in the hope they come in handy for someone struggling through a similar ordeal.

Funny side story: it’s already happened multiple times to me that I go out on a Google hunt to resolve some weird issue, and eventually bump into some info I wrote up somewhere, and then forgot about (in the most recent time it happened to me was on the Adobe forums – https://forums.adobe.com/thread/959112).

So, really, this article about ucf.jar is mostly about allowing Google to supplement my own memory. In a few years time I’ll no doubt will be struggling with ucf.jar and will end up on this page. Hi, Kris from the future!

.debug in ZXP, yes we can

First thingy: ucf.jar normally strips out .debug files. This was something I never checked or verified before now, but it looks like ucf.jar does The Right Thing, and strips out .debug

That is a good thing: you don’t want to deploy a ZXP that has a .debug file in it: it opens up a potential back door and some malicious person might try to break in via one of the open ports.

However, my extension was exhibiting different behavior after being packed up into a ZXP, so I really, really wanted to get a ZXP with a .debug file included.

After some poking I found it is possible to force the .debug file to come across by explicitly listing it on the command line.

Something akin to:

 java -jar ./signingtoolkit/ucf.jar  -package -storetype PKCS12 -keystore "$certfile" -storepass "$certpassword" -tsa http://timestamp.digicert.com com.rorohiko.harebrained.zxp -C ../build/dist/com.rorohiko.harebrained . -e ../build/dist/com.rorohiko.harebrained/.debug .debug

seems to do the trick ($certfile and $certpassword are bash environment variables). The trick is to explicitly add in the .debug file.

After that, Anastasiy’s Extension Manager (http://install.anastasiy.com/) happily installs the ZXP with the .debug file included.

Kill cfprefsd

My next head-scratcher came when I was mucking around on my Mac with PlayerDebugMode and LogLevel and the changes I made did not ‘take’.

Turns out there is some caching of preferences going on on Mac OS X, and you need to force the cache to be cleared.

The simplest method I found is to kill cfprefsd.

I now use a few simple double-clickable command-line bash scripts on my Mac to enable and disable the debug mode.

This is my ‘enable PlayerDebugMode’ script. Store it in a command-line script whose file name ends in ‘.command’ and it will be double-clickable from the Finder. Don’t forget to chmod +x !

defaults write com.adobe.CSXS.7.plist PlayerDebugMode 1
defaults write com.adobe.CSXS.7.plist LogLevel 5
killall -u `whoami` cfprefsd

And this is my ‘disable PlayerDebugMode’ script. Same deal.

defaults write com.adobe.CSXS.7.plist PlayerDebugMode 0
defaults write com.adobe.CSXS.7.plist LogLevel 0
killall -u `whoami` cfprefsd

PlayerDebugMode could be something else

The next thing that I figured out is that PlayerDebugMode seemed to only affect the signature verification of the ZXP, at least for the app I was working with.

My incorrect assumption was that PlayerDebugMode would also be turning on or off the debug mode.

That seems not to be the case: as far as I could tell I could leave PlayerDebugMode set to 0, and was still be able to debug the (signed and installed) ZXP, as long as it contains a .debug file.

I have not checked whether this is true for all Creative Cloud applications, but it sure was for the one I was working with.

ucf.jar don’t like no spaces

At some point in time, my fresh ZXPs failed to install due to signature issues.

As it turns out, that was because one of the files in my ZXP had a file name with a space in it.

That throws ucf.jar. I suspect it accounts for the file in the signature, but fails to include the file into the ZXP.

Unlike ucf.jar, ZxpSignCmd does not seem to have this issue.

Once I changed that file name all was well again.

Hope this helps!

Hacking cefclient for lazy CEP debugging

When working on extensions for the Adobe Creative Suite, you can use Chrome as a debugger.

When debugging is enabled, your extension will open up a port, and then you point your browser to http://localhost:<whateverport> to get to the debug interface.

Sadly enough, this stuff is kind of ‘broken-ish’ (see http://raspi.rwf.co/brokenish.html).

For example, you cannot type in the console to inspect stuff, so debugging is a bit frustrating.

Ole Kvern mentioned on the Slack group (adobedevs.slack.com) that a lot of this pain and suffering can be alleviated by using a slightly older cefclient instead of Chrome. See http://opensource.spotify.com/cefbuilds/index.html and look around in the older builds.

I did that and it works a treat.

I prodded and poked around a bit in the available builds, and found that version 51.0.2704.47 works OK for me. There might be more recent versions that work too, but I called ‘good enough’ on this one, and I did not put in any more time.

However, I am lazy. So here’s a little hack I performed. It’s nasty, but it works. I am using a Mac. I assume a closely related similar hack would be possible on Windows.

I only use this cefclient app to do CEP debugging, so I have no qualms making a hacked mongrel version to suit my needs.

For it to work, your debug URL must be exactly 21 characters long (e.g. http://localhost:8070 or suchlike. That means: you want to use a 4-digit port number in your .debug file).

Open the cefclient binary with a Hex Editor (on Mac, it is at …/cefclient.app/Contents/MacOS/cefclient ).

Search for the text ‘http://www.google.com’. It occurs twice – you want the one around position 0x552288.


Replace the text with whatever your debug URL. Make sure to not add or remove bytes. You need to overwrite the URL with something of the same length.

Save and Quit.

And now, each time I launch cefclient, it immediately goes to http://localhost:8070.

The clean way to do this would be to make a variant of cefclient that accepts command-line parameters. I might do that at some point; it would allow me to easily add a ‘debug’ button to my extensions and have it launch the debugger. Together with my old ‘dive into it’ hack (https://coppieters.nz/?p=63) that might make for a more seamless debugging experience. For now, this nasty hack will have to do…

GetURL for InDesign, Revisited (now with https)

Note 1-Nov-2020: Make sure to check out my novel approach to GetURL: making curl available in ExtendScript. Not just for InDesign – any Adobe app that supports ExtendScript can use this. More info here:

https://www.rorohiko.com/jsxgeturl

Note 16-Dec-2019: Latest installer which also supports InDesign 2020 and macOS Catalina:

https://www.rorohiko.com/downloads/ExtendExtendScript.1.0.4.zip

GetURL: some history

A long, long time ago, I wrote a bit of sample code to demonstrate state machines.

On a whim, I decided to implement a bit of the HTTP protocol in ExtendScript and InDesign.

It was never intended to be a full HTTP socket implementation, but in the end, it turned out that the sample served a purpose for many people, as it allowed them to interact with HTTP-based services from ExtendScript.

It was not very fast, and could not handle many HTTP features.

http://rorohiko.blogspot.co.nz/2013/01/geturlsjsx.html

Over time, I added a few little tweaks to help people out, but by now GetURL.jsx must be a contender for the longest living stopgap measure ever.

HTTPS?

Recently, more and more people started asking me for HTTPS support.

Sadly enough, crusty old GetURL.jsx is not up to the task: for efficient HTTPS support, things get a lot more complicated.

Doing it all in pure ExtendScript would be nearly certainly too slow.

So, I decided to find a different solution.

What I am presenting here is ‘work-in-progress’, or maybe better ‘mucking-around-in-progress’.

I am playing around, and try things out. I will probably be tweaking this for some time to come, but it currently works fairly well as-is, so for people in need, they can grab what I have, as-is, and try to make sense of it.

In the following post, I’ll show a solution that allows the ExtendScript coder to write something as simple as

#targetengine TestSomewhere
#include "JSInterface.jsx"

JSInterface.evalScript("console.log('hello');");

// or...
function handleData(data) { 
 alert(data);
}

JSInterface.evalScript(
  "JSInterface.plugins.getURL('https://www.rorohiko.com/welcome.msg')",
  handleData);

// or...

var url = "https://www.rorohiko.com/welcome.msg";
JSInterface.evalScript(
  "JSInterface.plugins.getURL(JSInterface.getData())", 
  url, 
  handleData);

Bear with me…

CEP

For a while now, InDesign and other Creative Cloud apps have been including the Adobe Common Extensibility Platform (CEP) and Extensions.

Essentially, an Extension is akin to a browser (Chrome) with a server (Node.js) all rolled into one, all running as an ancillary process inside of InDesign.

As a result, an InDesign scripter now has two totally separate programming environments at their disposal.

These environments share very similar languages (ExtendScript and JavaScript), which is often a bit confusing.

The ExtendScript (ES) programming environment is ‘inward facing’: it is tightly integrated with InDesign and can interact with the InDesign Document Object Model (DOM).

The JavaScript (JS) programming environment is ‘outward facing’: it can drive user-interfaces that are contained within floating panels and dialog boxes.

Because the JS environment has a complete Node.js available, writing things like an https-capable GetURL replacement is trivial on the JS side.

But that is not a proper solution for the ExtendScripter. A bit of extra work is needed.

Communicating between ES and JS

The ES and JS environments are quite separate, and run independently of one another. They don’t have a direct connection.

Instead, there is a ‘callback’-based interface. From the JS environment, one can initiate some operation in the ES environment. When the ES environment completes the task, it calls back to the JS environment with the results.

To compound the issue, the JS environment provides multiple independent runtimes (i.e. you can run multiple extensions concurrently), whereas the ES environment is a single-tasking shared resource: when an operation is launched from any of the active JS environments in ES, the ES environment gets busy in mumble mode, and any subsequent ES operation request from any other JS will stall until the previous ES operation is finished.

Lots more info about all this can be found here:

https://github.com/Adobe-CEP

CSInterface

One thing that always annoyed me a bit was the asymmetrical nature of the interface between JS and ES.

In JS you have a ‘CSInterface’ thingy and you can call sumtin’ like

csInterface.evalScript(<some script>, <some callback>)

to execute a script in ES, and be woken by the callback when it is done.

JSInterface: Evening The Score

To even the score a bit, I first set out to create a similar ‘JSInterface’, as a component of my ‘GetURL.jsx’-replacement.

JSInterface allows you to call JS from ES.  You can receive a callback when it is done.

The extension includes a CSXS manifest file that covers CC 2015 and CC 2017. I suspect it might run with lower versions after a bit of tweaking in the manifest, but I have not tried that.

For this to work, you also need to run your ES script in a persistent engine.

If you were to run in the ‘main’ (default) engine, the callback would not work because the whole engine vanishes out of existence as soon as the JS call returns and the ES script can run to completion.

Most of the time, a JS call will return before it completes, and a non-persistent ES engine will have gone by the time the JS call wants to perform a callback.

The main idea behind JSInterface is to allow developers to be ‘ExtendScript’-centric – i.e. concentrate on ExtendScript and ignore most of the JS details.

Often, you want to write some simple ExtendScript code, and don’t have any need for all the bells and whistles JS offers… except for one or two small features.

That’s where JSInterface comes in: you write all your code in ES, and occasionally call out to JS when you need something special.

JSInterface has a plug-in architecture. It currently comes with a single plugin, called ‘getURLPlugin’ which implements the coveted getURL method that can handle HTTPS.

Additional plug-ins can be added as needed: the idea is that you write little functions using JS/Node.js and expose them to ES via the plug-in architecture. You can then easily call them from ES, and JSInterface takes care of the glue.

Usage

Note: all material as-is: there is not much documentation. Use at your own risk.

You have a few options:

  • Simple Installer:
    https://www.rorohiko.com/downloads/ExtendExtendScript.1.0.4.zip
  • If you want to delve a bit deeper: ZXP file and source code:
    https://www.rorohiko.com/downloads/com.rorohiko.extendExtendScript.zip

    This source code folder contains
    – a subfolder call ‘dist’ containing a ZXP file
    – a subfolder called ‘com.rorohiko.extendExtendScript’ with all source code

  • Run the installer, or install the com.rorohiko.extendExtendScript.zxp, or install manually.
    For installing the ZXP file, you use something like Anastasiy’s Extension Manager (http://install.anastasiy.com/), or ZXPInstaller (http://zxpinstaller.com).
    You can also set the CEP debug flag, then copy the ExtendExtendScript extension manually from the source code folder into one of the Adobe extensions folders.
    Restart InDesign for good measure.
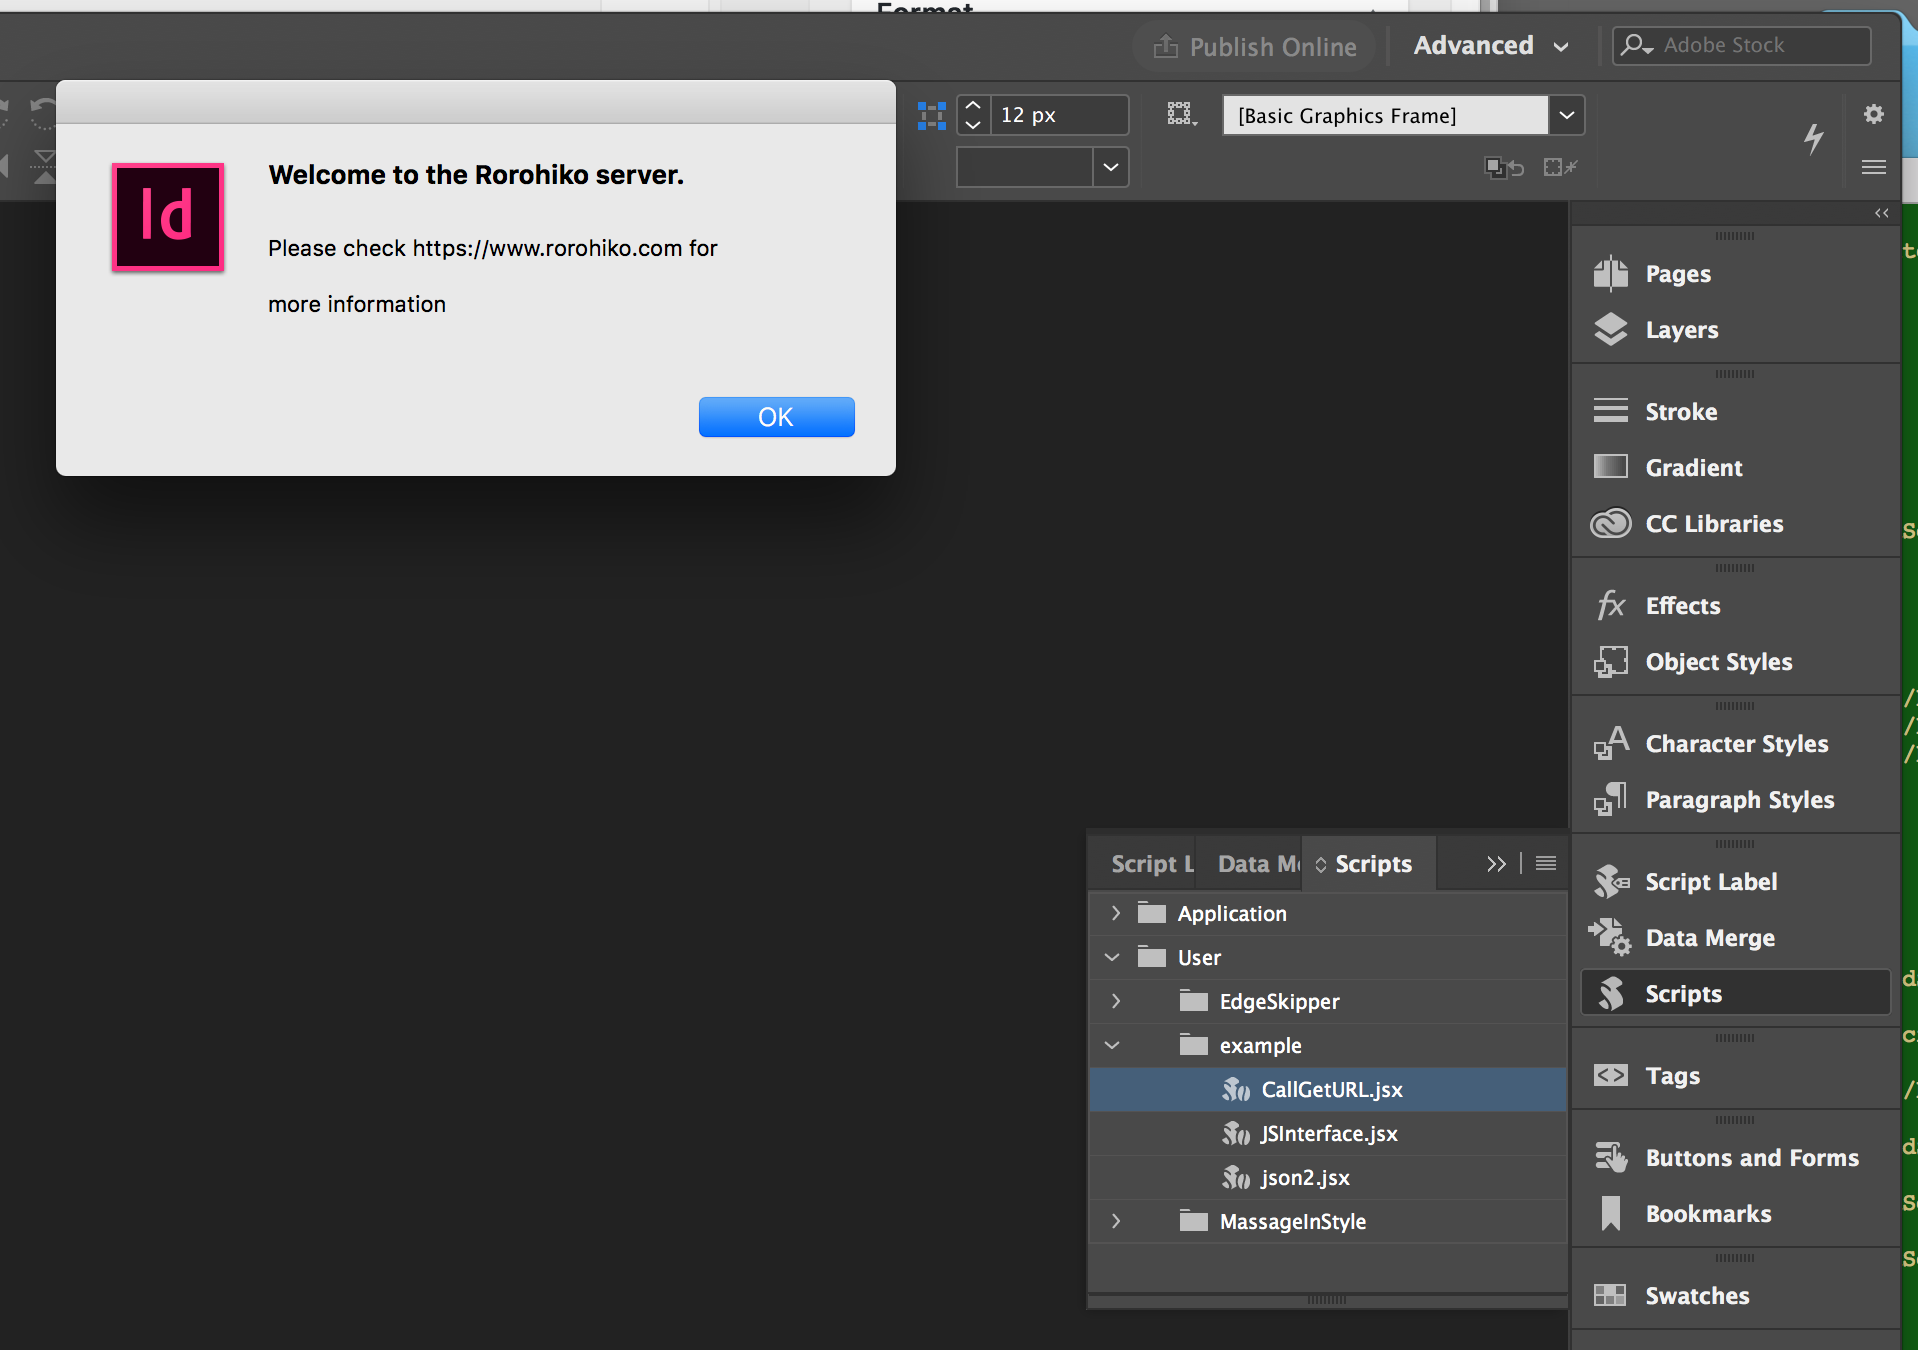
  • To see it in action: grab the following three files from the
    com.rorohiko.extendExtendScript/examplefolder
    

    and put them in the InDesign scripts folder or a subfolder thereof:

    CallGetURL.jsx
    json2.jsx
    JSInterface.jsx

    CallGetURL.jsx is the actual sample code; the other two files are modules that CallGetURL.jsx depends on.

  • Double-click CallGetURL.jsx. A dialog with some data retrieved from an HTTPS-based URL should display.

    JSInterface

If you want to delve into JSInterface or add plug-ins or suchlike, you’ll need to read a bit of code. Not much documentation there, but the code should be more or less straightforward.

Errata and Notes

Note 16-Dec-2019: There is now an easy installer for ExtendExtendScript which supports macOS Catalina and InDesign 2020.

Note 13-Mar-2018: There is now an easy installer for ExtendExtendScript. See https://coppieters.nz/?p=220

Note 11-Oct-2017: there was a bug in node_modules/GetURL/index.js. Around line 105 a line is missing:

 protocol.get(parsedURL, function(response) { protocol.get(parsedURL, function(response) {
 response.setEncoding('binary'); // <<< THIS IS MISSING
 function checkForCompletion() {


I’ve updated the downloadable .zip file

I’ll be at the Creative Developers Summit in Atlanta in May 2017 – anyone in need of more info or assistance, feel free to catch up with me there!

Things To Come

Silly thoughts: I want to do some debugging/monitoring support in the panel (e.g. allow console.log from ExtendScript). Maybe get started on a ES Toolkit replacement or ScriptUI replacement as a panel?

Creative Developers Summit